Technicians hate working with slow diagnostic laptops and often times, getting a new computer or performing a massive overhaul on your existing one is out the question. So what is there left to do? Below you’ll find some simple tips and tricks to boost your laptop’s speed without having to make any hardware changes or buy any upgraded parts.
#1. Change to the “High Performance” Power Plan
Most computers by default come set to the “Balanced” power plan. This is a good middle ground as it runs well and saves battery. If it is speed you’re after, click the battery icon and go into the power settings. Change it from “Balanced to “High Performance”. This tells your laptop’s processor to use a little more power in exchange for some more speed. The difference won’t be massive, but it should be enough to notice.
#2. Set Your Diagnostic Programs to “High Priority”
This is another trick where you go into the settings and tell your computer to place a higher priority on your diagnostic programs. By doing this you’re telling your computer that the diagnostic software should have the highest priority, meaning more power will allocated to making sure they open and run faster.
- Press Ctrl + Shift + Esc to start Task Manager.
- Go to the Details tab, right-click the desired process, and choose Set priority and select any value that you want.
- When the confirmation dialog appears, select Change priority.
This is the easiest way to set priority in Task Manager, and the priority for that process will remain changed until you end the process or turn off your PC.
For a more detailed step-by-step guide on how to do this click here
#3. Defrag Your Hard Drive
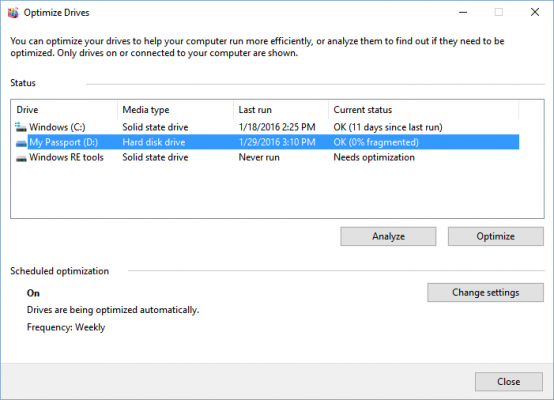
Defragmenting your hard drive
1. Open the disk optimization tool by searching for “optimize” or “defrag” in the taskbar.

2. Select your hard drive and click Analyze. Note that if you have a SSD, this option is grayed out and not available.
3. Check the percentage of fragmented files in the results.
There’s no hard and fast rule about how fragmented your drive should be before you defrag it. You might want to keep your fragmentation percentage under 5% or so, however, so that the defragmentation process doesn’t take too long to finish.
4. If you want to defragment your drive, click Optimize. It’s best to do this when you don’t need to use your computer for anything else, so you can let Windows defragment the drive efficiently.
When Windows is done, your drive should say 0% fragmented in the Optimize Drives utility.
For a detailed step-by-step guide on how to do this click here